OK, the sharp points look like a neuron under a microscope and the circle with all the negative interior space looks vaguely Klingon. Version 2 gives us a slightly easier build (I wasn’t looking forward to coopering a hoop, anyway) and a greater sense of rotary movement (it will be mounted on a lazy susan that actually functions, unlike the plastic board we have now) as well as something for the players’ fingers to push when rotating the board clockwise.
Just about finished in Sketchup, having solved the joinery problems (tapered dadoes…mmm) and added an internal storage compartment for tiles, racks and a dictionary. Still need to shop for some bits of colorful exotics for the board, but the majority of the construction is shaping up to be Sapele and Ash left over from my daughter’s bed.
OK, time to start making sawdust…if only I can excavate the mountain of bicycles concealing my tools.
The game is afoot. Thick Sapele veneers leftover from a a pencil post
bed become edge banding for poplar box sides.
Glued the poplar sides onto a sheet of plywood and flushed the edges. This may be where the project rests for a few days while I paint a house elsewhere. Next step, however, is to veneer the outside of this box. Quiet, hand tool work and I might be able to get some movement during evenings.
(Sharp blade) + (Low bed angle) = (Smooth end grain without the deafening scream of a router)
As predicted, some quiet hand tool work that I can do after hours. Should be set to start munching up a big board to make a trio of frames later this week. No escaping the router at that point.
These boards are all leftover from my daughter’s bed (witness the old chalk marks) and no, I generally don’t misoverestimate lumber this badly. My bed design included a set of removable guard rails and that determined the cut list I brought to the yard.
Working on the project, though, I said to myself, “…As fast as this kid is growing, she’s going to outgrow guard rails in a matter of months, relegating all this beautiful hardwood to the salvage pile.” So I put these boards aside and made the rails out of Ash. Good thing, as she surprised even me: Within weeks — not months — the Ash rails were down in storage.
So here they are waiting to be turned into a turntable. The layout lines and chalk are fairly self-explanatory. After taking these pictures, I reached for my Disston #12, poured a bowl of Wheaties and contemplated twenty feet of rip cuts in exotic hardwood…
(Kidding, kidding.)
Time tonight to rearrange the garage in anticipation of long rips on the table saw tomorrow morning.
————————————
Huzzah for a rainy morning. Got through planing and crosscutting the frames. Should be able to crank out joinery and assembly over the weekend.
————————————
The house I’m painting is taken over for a few days by a window contractor, leaving me time to recover lost momentum here.
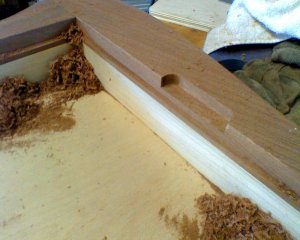
Lap joints galore and I don’t have a tenoning jig. So we do it by nibbling and paring. A big lump of lead solder does a nice job keeping everything flat on the sled. Leaving pieces overlong (when possible) means that the cut is supported on both sides of the blade. All of this goes into the bandsaw later, so I don’t care what the outside of the frames looks like now.
Got through the noisy business for two of the three frames. (The third needs a different saw setup anyway.) Some hand tool cleanup and probably gluing tonight.
——————————
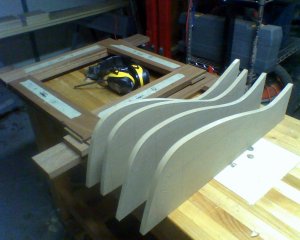
Haven’t totally dropped off the map. The frames are glued together, time to make some templates. Between the three frames, there are four similar but slightly different curves to cut.
——————————
Frames and fishes. Just about done shaping the templates and time to look for a clear, noise-makeable day when I can do the cutting and routing.
——————————
Forgot to send these in earlier. Much to my wife’s chagrin, our countertop is the flattest surface in the house. Something to rectify in a new shop, some day.
——————————
Thursdays are always my most productive days.
Each template gets used on up to four different surfaces. That’d be a lot of double sided tape to apply and scrape away. So I drilled some holes and turned each template into its own clamp. Curves and profiles routed, sanded to 120 for now and given a quick rub of solvent to see how things are coming.
——————————
Routed finger recesses for the removable top. Too shallow to get a roundover bit around the inside edge here, so I’ll have to shape these by hand.
Started work on the top itself. The bottom gets the same Sapele veneer as elsewhere. Naturally, we do the bottom first
a.) to practice before doing the exotics on the top and
b.) if we screw up, it’ll go in the burn pile without too much fuss.
——————————————
No sawdust today, just calculations.
——————————————
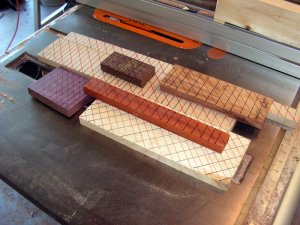
Huzzah. Got through the first round of noisiness for the board top. The first rip determines the longer side of each square. The board is 14″ long and there are fifteen squares, and Sketchup tells me we need to set our fence to precisely .933″ This is why we keep worthless pieces of pallet lumber around and I got it on the second try.
From there, it was over to the crosscut sled to chop things up and make a pile of small blocks.
——————————————-
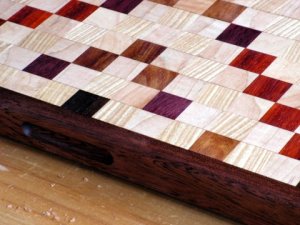
Conceptually no different from a chess board, but the pieces are smaller and there’s a lot more of them. The board is symmetrical around the center row, so we can do one half…OK, actually eight
fifteenths…slice it open for a book match, giving us the entire board.
This also explains the multicolored stripes. All of these look like cubes, but they’re not. At this stage, they have one critical dimension (width) and two ballpark dimensions (length and thickness).
It’d be all too easy to get one oriented wrong, ruining an entire stick.
Biggest concern on the horizon is bleeding in the finish. I know (learned the hard way on the last build challenge, rather) that the pigment in padauk is alcohol soluble. Shellac is therefore out of the question.
——————————————-
Physically treacherous part (i.e. slicing up little bits of inlays) done and greatly aided by a small jig to carry things through the blade. Here begins the more mentally treacherous task of sticking these onto the substrate.
I’m not brave enough to do them all at once, so we’ll do one row at a time.
——————————————-
Done veneering and sanded things flat, time to trim the board to size and get measurements for banding the edges. The finish line is in sight.
——————————————-
——————————————-
The first coat of finish is like reaching the summit of a mountain. It’s a grand thrill that validates all the hard work up to that point. But the joy is tempered by knowledge that you’re only halfway home and more climbers die during the descent that during the climb.
Anyway, philosophy aside, I tried to get a video of the magic moment when the wood first starts to glow but the #@&$%! camera’s autofocus couldn’t make up its mind and settle down.
Note from Rick – We cannot support Rob’s video clip. WordPress doesn’t like the format. Sorry.
——————————————-
No, I’m not left handed. But after sanding the first fifty tiles I had to switch off.
Still not sure what I want the letters to look like, so I’m just doodling with a basic Uncial for now.
——————————————-
As hoped, a spit coat of shellac and we get crisp edges without the ink bleeding all over the place.
Finally getting around to lettering tonight. Predictably (in hindsight, at least) applying ink to endgrain had some pretty awful results at first. A quick blast of shellac and the ink should be much happier.
Saved by the spray. Three coats or so of shellac delivered aerosol indeed got a sufficient lock on all the padauk juices. Now we can start brushing a heavier cut to get some build without worrying about smearing the colors.
——————————————-
Done.
After a few days of finishing (coat, rub, coat, rub, coat…) all that remained of the build was to make a small pouch for the letters out of cutoffs from an old pair of jeans.
Last step will be to get a proper photo of the piece.
——————————————-
Not much else to say other than thanks for a fun ride.


Alright Doc …….where you goi’in?????
Lots of wondering going on here…..COOL…………..Neil
Nice Rob………..like the progression in your design process right into the function and the tactile nature of a lazy susan. WOW—things could get very exciting here.
THANKS Doc for poking out of the box………Neil
Rob
This looks really cool. When I first saw your drawings I like “huh?” but seeing it come together I am really digging it. Great work!
Jon
Thanks, Jon. It’s turning out to be a fun project.
Rob,
I saw your question on the WW forum, and have to tell you how great your top looks.
Great idea and follow through in creating this.
Keith
Thanks for the encouragement, Keith. Should have things completely veneered by tonight.
Rob
This contiues to get cooler and cooler. great job man.
Jon
Very cool Rob. Congrats on getting it done, it looks great.
Wild job, dude! I am truly impressed.
Congratulations Rob,
Your game table is a work of art. I think everyone knew very early on that your project was going to win. Not only was the design unique and execution beautiful, but you were halfway done before most of us had even decided what to do. Someday I plan to build a chess board and I will look to your project for inspiration. Well done!
Tom Collins
And I’ve played Scrabble against him several times on this artistry…and haven’t won yet…!
Rob averages two ‘bingos’ each game.
A craftsman and a good player…(beats his own Dad…)
Rob,
Wow! Dude, you have major talent!
That board is beautiful. Congratulations on a wonderful project. You certainly deserved to win.