So after a false start with a different project choice, I’m on my way with a cradle for my soon to be here 3rd son. I’ve decided to go with all cherry. I played with the idea of doing another wood to complement it but this is going to be challenging enough for me without that as well. The rough dimensions are 31.5″x21.5″x21.5″. The finish I think I’ll use is an oil finish with a wax over that.
The pictures are a rough drawing and a picture of me with my full scale drawings. I took the idea for doing a full scale drawing from one of the very early pod casts Rick did. I’m glad I took the time, because the first design did work, it was way to shallow. The full scale drawings also allowed my wife to review the project and make some suggestions.
So my next step is to select some boards, talk to you all soon.
Hey All
Okay I’m back and things are slowly progressing. I’ve made some progress on the project and learned a few lessons on the way, some good learning type stuff and some irritating stuff.
So here’s the good stuff;
Lesson 1:
I learned how to make a panel out of nothing more than two pieces of wood and glue. I know everyone is amazed, how is it possible that someone could make a panel. Don’t worry, I’ll let you in on the super secret recipe, but make sure you keep it to yourself. After all we don’t want everyone making them. 🙂 Here’s what you’ll need; 2 boards with a jointed edge, glue (wood glue not super glue) and some clamps. Here’s the process – joint the edges, put some glue on them and clamp them together. Amazing isn’t it!
What I learned from this – Well, I didn’t learn how I’ll use this biscuit jointer I bought. Maybe I’ll use it to make coin stands or something. But I do know that you can make some awesomely strong panels with nothing more then long grain to long grain and glue. I seriously thought you needed a biscuit jointer to make panels, so I bought one. Then I saw this video and the guy said you don’t need them, in fact you probably create a weaker joint if you use them. He said you could glue two board together and the wood around the joint would break before the joint. So I tried it and I couldn’t break it. Now I weigh 200 plus and I stood on these boards, right at the joint and nothing happened. In hind sight this was a little dumb, me standing on 3 feet of board between two five gallon buckets. If it had broken, I probably would have taken a dive on the concrete floor and I would have broken this expensive cherry panel. But it didn’t and now I know.
Lesson 2: Also learned during the panel glue up. Clamps can be glued to wood surfaces. Yes, you heard it here, another amazing achievement by Jon is his odyssey to learn woodworking without removing any appendages.
What I learned from this – Put clear tape on the part of the clamp that will get glue on it. Also, wood is stronger than plastic but not stronger then a chisel. Oh ya, one other thing, stores don’t sell the little plastic end caps to the clamps, you have to buy entirely new clamps if you glue yours to the wood.
Lesson 3 – Dust gets everywhere if you use the table saw allot. “What the heck did you do to the garage!”. That is what I heard after cutting up the lumber for this and another project. Total mess, dust everywhere, all over the clean clothes, the birthday gifts, the pantry, etc, etc. Dust = unhappy wife = unhappy me. So what to do, well the cheapo dust collection table saw mod. That’s right it couldn’t have been any more cheap if I’d used duct table (oh wait I did). So my table saw has like this massive hole in the side of it 16’’x15’’ and I wasn’t going to pay 90 bucks for a delta motor cover. My solution, 5 dollar Tupperware bin from Wal-Mart. Two screws, some duct tape (the real stuff) and slap a dust port on the back and you’re done. So far it seams to work ok. Total cost 15 bucks, assuming you have something to pull the dust already. No dust = happy wife. I’ll let you know how well it works next time, I am cutting some wood for a cutting board and that should test it real thoroughly.
The irritating stuff:
Last lesson: Grrrr! Yes you heard me Grrr! So I have this thickness planner and I have yet to use it. Why you ask, well because it scares the @$%^ out of me. I saw this video where this dude launched a board across the room at about a million-zillion miles an hour because he used it wrong. So this guy appeared to have some skills and I don’t and my manual doesn’t teach you how to use it, so I don’t use it yet. I am searching for some kind of how to guide but have yet to find it.
So why am I driveling on about this? Well this is why. I thought a simple solution was to buy milled lumber. So I bought something can S3S, I think, anyway it is supposed to be milled on three sides (one edge and the two larger surfaces). To me this means things are perfectly flat and at either a right angle or parallel to each other. Apparently not! Hence the Grrr, and the story about the planner. So I bought about 35 board feet of this stuff and 3 of the seven boards are not flat or they are warped. Just take it back to the dealer you say, nope. Apparently wood can change when moved from one place to another (yes I knew this). What I didn’t know was that the 10 miles from the *&%^ store to my garage is apparently in another climate. I admit I didn’t check it well at the store but come on.
What I Learned – check the lumber before you bring it home. Oh ya, and don’t buy from that dealer.
See you next time, I hope you enjoyed reading my drivel.
——————————–
Hey All
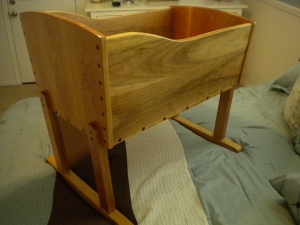
Okay I’m back and things have picked up a bit. I have the main body of the cradle assembled. I had to change the intital design a little. Origionally I was going to only have a set of short rockers that connected to the bottom of the cradle but when my wife she asked me to make it taller. She also asked me to make is rock with a gliding mechinism but after looking at that I had to pass. I just didn’t think I could get it done in the time frame I have left. I am working the rockers and legs now and man are the rockers a pain. I don’t know if the way I am making them is off or if the process is just time consuming but these are taking forever.
I learned that alighnment of panels in glue up is harder than I thought. Every panel I glued up had a lip on it between the boards. I even had a few the look like they shifted during glue up so the lip is twisted. My solution, biscuit jointer. So I found a use for that biscuit jointer after all. I also I learned that a thickness planner can help with this and another problem. I wasn’t using this tool because it gave me the willies but after using it I think it is way safer than the jointer.
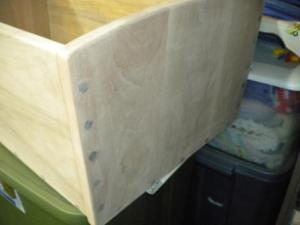
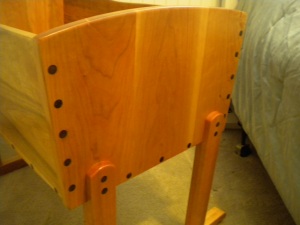
A few details on the jointery. I was trying to figure out how to join everything together. I could use biscuits, rabits, grooves, ect but I eventually decided use butt joints and screws. I know there are better ways but involved really threw me and I am running out of time. There have been many new learning experiances on this already and I already know how to do this kind of joint (used it before). Besides I like the contrast between the Cherry panels and the Walnut plugs.
Below are some pictures of the parts so far. Any feedback of suggestions are appreciated. I particulary like to know if there is a easier way to make rockers other than the bandsaw and a sander, this is taking much more time than I have.
By the way, the cradle is exactly 31 7/8th inches long from top edge to top edge. Talk about pushing it.
——————————–
So I’ve finished the project. I ended up learning quite alot. I just want to thank you and the guys for putting this contest on. It has been great motivation to both complete the project and push myself to get the best results I could. So thanks a bunch.
I stuck to the rules pretty good.
Size: The longest dimention in 31 7/8th from side to side. Barely squeezed it in. 🙂
Expenses: Total ~$135
Wood – Solid cherry – Approximately 15 board feet. $4.50 a board foot Cost $67 bucks
Sand Paper – 30 bucks
Screws & biscuits – 2 bucks
Wipe on Poly – 15 bucks
Walnut pegs – 5 bucks
Glue – 10 bucks
Sanding Drums (2) – 5 bucks
Construction Materials:
Solid cherry boards & some walnut plugs.
Wood filler. – No store bought wood filler used. I did make my own using sawdust and glue. I used this on the plugs, when I cut them flush there was some tearout.
Finishing Materials: Wipe on poly
Adhesives: Tight bond
Joinery: Butt Joints, screws and biscuits
Tools: No new tools bought.
Thanks again


To make the rockers you may want to use a router template made out of ¼” hardboard. Being only a ¼” thick, it is easier to shape and smooth one template. Then cut out the rockers close to the line using the band saw and trim them to final size and shape using the template and a pattern bit in your router.
To stop tear out when trimming plugs flush, put some masking tape across the wood on both sides of the plug, then cut with a flush cut saw, remove the tape and finish with sand paper.